from pip._internal import main as _main
import importlib

def _import(name, module, ver=None):
    try:
        globals()[name] = importlib.import_module(module)
    except ImportError:
        try:
            if ver is None:
                _main(['install', module])
            else:
                _main(['install', '{}=={}'.format(module, ver)])
            globals()[name] = importlib.import_module(module)
        except:
            print("can't import: {}".format(module))

_import('psutil','psutil', '5.7.0')
WindowsとLinuxからプロセスごとのCPU使用率、メモリ使用率、ディスク読み書き量を取得する方法
PS C:\Users\Masahiro> Get-Counter -ListSet process | Select-Object -ExpandProperty Paths
\Process(*)\% Processor Time "CPU使用率"
\Process(*)\% User Time "CPU使用率のうちユーザーの分"
\Process(*)\% Privileged Time "CPU使用率のうちカーネルの分 IO等の待ち時間が大きいのはこっち"
\Process(*)\Working Set "現在の実メモリ使用量"
\Process(*)\Virtual Bytes "現在の仮想メモリ使用量"
\Process(*)\Page Faults/sec "ページフォルトの発生数"
\Process(*)\IO Read Bytes/sec "1秒あたりの読み込み量"
\Process(*)\IO Write Bytes/sec "1秒あたりの書き込み量"

\Process(*)\Virtual Bytes Peak "仮想メモリ使用量の最大値"
\Process(*)\Working Set Peak "実メモリ使用量の最大値"
\Process(*)\Private Bytes "プライベートメモリ使用量"
\Process(*)\Working Set - Private "実メモリ-プライベートメモリ"
\Process(*)\Page File Bytes Peak "ページングファイルの使用量の最大値"
\Process(*)\Page File Bytes "現在のページングファイルの使用量"
\Process(*)\Thread Count "有効なスレッド数"
\Process(*)\Priority Base "プロセスの優先度"
\Process(*)\Elapsed Time "経過時間"
\Process(*)\ID Process "識別子"
\Process(*)\Creating Process ID
\Process(*)\Pool Paged Bytes "ページプールメモリの使用量"
\Process(*)\Pool Nonpaged Bytes
\Process(*)\Handle Count
\Process(*)\IO Read Operations/sec
\Process(*)\IO Write Operations/sec
\Process(*)\IO Data Operations/sec
\Process(*)\IO Other Operations/sec
\Process(*)\IO Data Bytes/sec データのIO全部
\Process(*)\IO Other Bytes/sec 他
Linuxの場合
各プロセスのCPU使用率
$ pidstat -u
UID ユーザーID
PID プロセスID
%usr CPU使用率のうちユーザーの分
%system CPU使用率のうちカーネルの分
%guest
%wait  CPU使用率のうちIOの分
%CPU CPU使用率
CPU CPUの番号
Command
各プロセスのメモリ使用率
$ pidstat -r
UID
PID
minflt/s  マイナーページフォルト数
majflt/s  メジャーページフォルト(ディスクから)数
VSZ     現在の仮想メモリ使用量 [KB]
RSS    物理メモリ使用量 [KB]
%MEM
Command
ディスクの使用量
$ pidstat -d
 UID
PID
kB_rd/s   1秒あたりの読み出し量
kB_wr/s   1秒あたりの書き込み量
kB_ccwr/s
iodelay
Command
【 pidstat 】コマンド――プロセスのリソース使用量を表示する:Linux基本コマンドTips(129) - @IT
http://sebastien.godard.pagesperso-orange.fr/documentation.html
Python + numpyを使って、3次元球面上/球内にランダムに点を描画するプログラム
原理は先人のページを参考にしてほしい。以下、3次元球面上に乱数で点を描画するプログラムのPythonによる実装
import numpy as np
xs = []
ys = []
zs = []

# 乱数を初期化
rng = np.random.RandomState(123)
for _ in range(5000):
    theta = np.arccos(rng.uniform(-1, 1))
    phi = rng.uniform(0, 2*np.pi)
    x = np.sin(theta) * np.cos(phi)
    y = np.sin(theta) * np.sin(phi)
    z = np.cos(theta)
    xs.append(x)
    ys.append(y)
    zs.append(z)

#以下描画用
import matplotlib.pyplot as plt

plt.hist(xs,bins=30)
plt.show()
plt.hist(ys,bins=30)
plt.show()
plt.hist(zs,bins=30)
plt.show()
plt.scatter(xs,ys,marker=".")
plt.show()
plt.scatter(ys,zs,marker=".")
plt.show()
plt.scatter(zs,xs,marker=".")
plt.show()
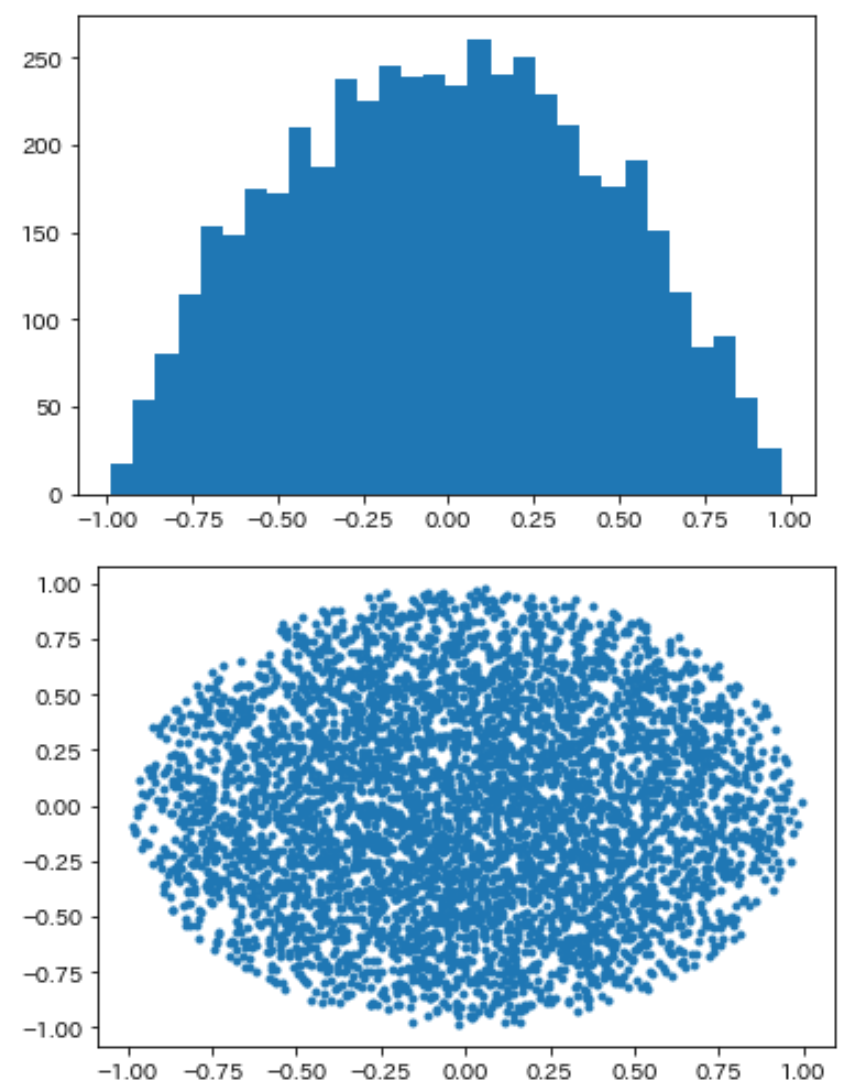
出力されたグラフの一部

3次元球内に乱数で点を描画するプログラムは、for文を以下のように変更する
for _ in range(5000):
    theta = rng.uniform(-1,1)
    phi = rng.uniform(0,2*np.pi)
    r = rng.uniform(0, 1)
    x=r**(1/3)*(1-theta**2)*np.cos(phi)
    y=r**(1/3)*(1-theta**2)*np.sin(phi)
    z=r**(1/3)*theta
    xs.append(x)
    ys.append(y)
    zs.append(z)
出力されたグラフの一部

参考までに、円の内部に乱数で点を描画するプログラム
import numpy as np
xs = []
ys = []

# 乱数を初期化
rng = np.random.RandomState(13)
for _ in range(5000):
    phi = rng.uniform(0,2*np.pi)
    r = rng.uniform(0, 1)
    x=r**(1/2)*np.cos(phi)
    y=r**(1/2)*np.sin(phi)
    xs.append(x)
    ys.append(y)
数学的な理解は
VidyoConnectで「ポータルに接続できませんでした。再度試すか、管理者に連絡してください。」というトラブルとその対処
vidyoportal.cern.ch に接続しようとして「ポータルに接続できませんでした。再度試すか、管理者に連絡してください。」というエラーが出た。
VidyoConnectを再インストールしてもダメ、再起動してもダメ、あー終わったと思って、ブラウザからの接続で凌いだが時既に遅し。

その後、CERNのVideoconference Supportに連絡したところ、以下のようにしろと英語で連絡があったので日本語訳を載せておく。
VidyoConnectを閉じる

Windowsボタンから「証明書」で検索し、「ユーザー証明書の管理」を開く
操作ウィンドウの表示/非表示」を選択
「他の操作」→「証明書を検索 」を選択
`addtrust` を検索
全ての項目を削除
`RSA` を検索、期限切れの証明書があれば削除 (当方の環境ではなかった)
PCを再起動
VidyoConnect を起動、接続
原文
Quit VidyoConnect.

Type 'certificates' in the Windows search bar
Select 'manage user certificates'
Click on the 'show/hide action pane'
Click on 'more actions/find certificates'
Enter 'addtrust' in the 'contains' field then click on 'find now'
Right click on each entry and delete.
Do the samefor 'RSA' and delete expired certificate if you find one.
Reboot PC and try Vidyo connection.
削除してる様子。運悪く5月30日で証明書が切れていた。KEKの方には接続できていたので、サーバー側の問題だと思ったが、まさかローカルの証明書の期限切れ問題とは...

私の環境では、6つの期限切れの証明書を削除、PCを再起動でこれで接続できるようになりました。
「それでも動かない場合は、新しい証明書をインストールしてください」とZIPファイルは渡されたが、これは使わなかった。
原文
If it does not work, please install the new certificates (attached) (open the Zipped file, and double-click on each file to install them)
Pythonで画像のラベリング→輝度値0以外の領域を分割して領域ごとの座標と輝度値リストを取得する
バージョン3以降のOpenCVには、画像のラベリングできる関数が実装されている。
connectedComponents は、入力画像と同じサイズの画像にラベルの番号が書かれた画像を返してくれる。
connectedComponentsWithStats はStats、すなわち面積、重心等を含めた情報を返してくれる(以下の例では使っていない)。
つまり輝度値が0以外の領域を上下左右の周辺4方向や、周辺8方向で繋げて、繋がらない部分を分割して、領域ごとの座標と輝度値のリストを取得するには、connectedComponents を使えば良い。
import cv2
# 画像読み込み
img = cv2.imread(r"file0117.png",-1)
thr=cv2.add(img,-55)

##接続条件は上下左右(4)のみ
n, label = cv2.connectedComponents(thr,None,4)

# [x y 輝度値]の配列を格納する
connected = []
for _ in range(n):
    connected.append([])

#Labelから輝度値を抜き出す
for y, (y1,y2) in enumerate(zip(thr,label)) :
    for x, (x1, x2) in  enumerate(zip(y1,y2)):
        if connected[x2] is None:
            continue
        if x1==0:
            connected[x2]=None
            continue
        connected[x2].append([x,y,int(x1)])

#輝度0の領域を排除する
connected = [c for c in connected if c is not None]

#領域数を出力
print("Number of connected area is", len(connected))
サンプル画像を使うと Number of connected area is 20112 と出力されるはずである。
