物理の駅 Physics station by 現役研究者

テクノロジーは共有されてこそ栄える

SRIM 2013を日本語版 Windows 10 64bitで動かすためのメモ

とても個人的なメモなので、使えなくても泣かないお約束で。

SRIM本体は下記のURLからインストールする。

http://www.srim.org/SRIM/SRIMLEGL.htm

Msvbvm50.dll がないと怒られるので、下記URLからMsvbvm50.exeダウンロードし実行する

https://support.microsoft.com/ja-jp/help/180071/file-msvbvm50-exe-installs-visual-basic-5-0-run-time-files

RICHTX32.OCX がなんとかってエラーが出るので、下記URLから Visual Basic 6.0 Service Pack 6 をダウンロード

Download Visual Basic 6.0 Service Pack 6 from Official Microsoft Download Center

適当なフォルダに展開し、さらにフォルダ内の RichTx32.CAB を展開する。

RICHTX32.OCX というファイルがあるので、 C:\Windows\SysWOW64 にコピーし、管理者権限のコマンドプロンプト

cd C:\Windows\SysWOW64
regsvr32 RICHTX32.OCX

を実行する。同様の処理をさらに4つのファイルで行う

  • COMDLG32.CAB
  • MSFLXGRD.CAB
  • TABCTL32.CAB
  • COMCTL32.CAB
regsvr32 COMDLG32.OCX
regsvr32 MSFLXGRD.OCX
regsvr32 TABCTL32.OCX
regsvr32 COMCTL32.OCX

これで、 SR.exe (静的にdE/dx やStragglingを計算するソフト)や、 TRIM.exe (動的に粒子を打ち込むソフト)が動くはずである。

TRIM.exe を実行するための TRIM.in ファイルを作るための TIN.exe は動かない。 SRIM.exe に特段の機能は無い。
pythonでファイルを1行ずつ読み込む+書き出す方法

行頭に # 付きはコメント行、空白行は読み飛ばす

読み込み1

def read_txt(filename):
    lines = []
    for line in open(filename, 'r'):
        if len(line) == 1:
            continue
        if line[0] == "#":
            continue
        lines.append(line)
    return lines

読み込み2

def read_data12(filename):
    items = {}
    for line in open(filename, 'r'):
        if len(line) == 1:
            continue
        if line[0] == "#":
            continue
        item_list = line.split()
        items["data1"] = float(item_list[0])
        items["data2"] = float(item_list[1])
    return items

読み込み3

data1 = []
data2 = []
for line in open(filename, 'r'):
    if len(line) == 1:
        continue
    if line[0] == "#":
        continue
    item_list = line.split()
    data1.append(float(item_list[0]))
    data2.append(float(item_list[1]))

print(data1)
print(data2)

書き出し1

data1 = [1, 2]
data2 = [3, 4]
with open(filename, 'w') as f:
    for d1, d2 in zip(data1, data2):
        f.write(str(d1)+" "+str(d2)+"\n")

出力すると以下のようになる

1 3
2 4

C# WPFで グリッドマーク上にTextBlockやRectangleを配置する

供養

var textBlock = new TextBlock
{
    HorizontalAlignment = HorizontalAlignment.Center,
    VerticalAlignment = VerticalAlignment.Center,
    Text = text,
    FontSize = 0.1
};
var rectangle = new Rectangle
{
    Stroke = Brushes.Black,
    StrokeThickness = 0.3
};
Grid.SetColumn(textBlock, x);
Grid.SetRow(textBlock, y);
Grid2.Children.Insert(0, textBlock);

Grid.SetColumn(rectangle, x - 1);
Grid.SetColumnSpan(rectangle, 3);
Grid.SetRow(rectangle, y - 1);
Grid.SetRowSpan(rectangle, 3);
Grid2.Children.Insert(0, rectangle);

C#でPythonのスクリプトを実行して戻り値を取得する方法

英語をすらすら読める人はここを読めば全て解決する。 code.msdn.microsoft.com

C#からPythonを呼び出し、返り値を取得する方法としては、C#におけるプロセス間通信の一つである Process を使って、Pythonスクリプトを実行し、その標準出力(コンソール出力)をストリームで受け取るという方法が最も現実的だろう。

Python側ではmainに相当する部分と戻り値を渡すための print 文を書いておく必要がある。 Pythonの関数の戻り値そのものを取得できるわけではないので、ある関数だけ実行するということはできないし、想定していない標準出力には対応できない。 以下は、上記のURLのサンプル例を自分なりに修正したもの。

Program.cs

using System;
using System.Diagnostics;
using System.IO;

namespace ConsoleApp4_python
{
    class Program
    {
        static void Main(string[] args)
        {
            //下記のPythonスクリプトへのファイルパスを記述する
            string myPythonApp = "test.py"; 

            int x = 2;
            int y = 5;

            var myProcess = new Process
            {
                StartInfo = new ProcessStartInfo("python.exe")
                {
                    UseShellExecute = false,
                    RedirectStandardOutput = true,
                    Arguments = myPythonApp + " " + x + " " + y
                }
            };

            myProcess.Start();
            StreamReader myStreamReader = myProcess.StandardOutput;
            string myString = myStreamReader.ReadLine();
            myProcess.WaitForExit();
            myProcess.Close();

            Console.WriteLine("Value received from script: " + myString);
        }
    }
}

test.py として以下のように書く。

import sys 
 
x = int(sys.argv[1])  
y = int(sys.argv[2]) 
 
print(x + y)

簡略化のため if __name__ == '__main__': は省略してあるが、あっても良い。

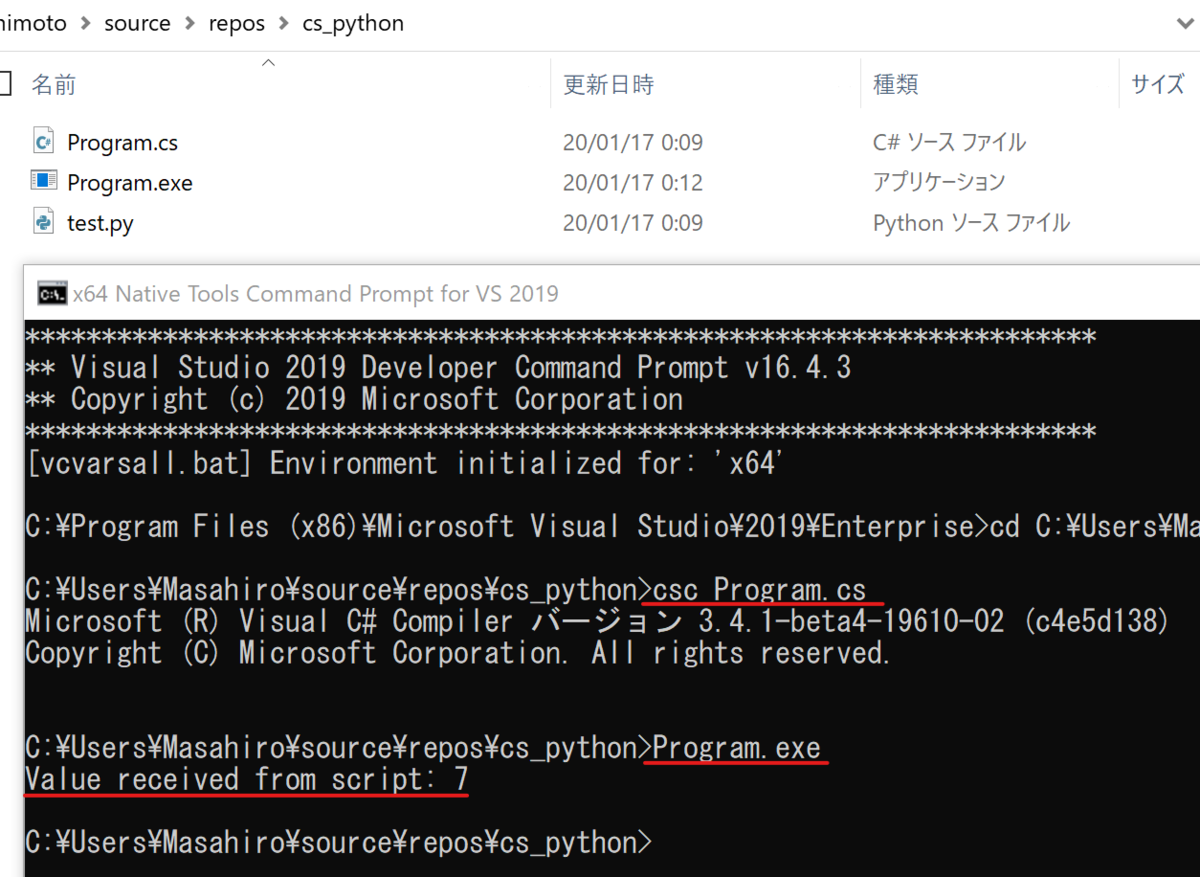
Pythonのファイルは、C#の実行時の作業フォルダと同じ場所に置き、Visual Studio等でコンパイルするなどして実行したら次のように表示されるだろう。

Value received from script: 7

フォルダ構成例と、Visual Studioコマンドプロンプトから C#コンパイルするための csc Program.cs を実行して Program.exe を作成し、実行してみた例を以下に示す。

f:id:onsanai:20200117001426p:plain